Dermatologist Microscope, Wood Lamp, Magnifying Lens: dermatology Tools
Dermatologist microscopes, Wood lamps, and magnifying lenses are key for dermatology diagnosis. They detect melanoma, fungal infections, and pigment issues through imaging, UV light, and magnification, which is essential for accurate dermatology practice.
Mastering Dermatology Diagnostics: The Essential Role of Microscopes, Wood Lamps, and Magnifying Lenses
In the ever-evolving field of dermatology, precision and accuracy are paramount. Tools like dermatologist microscopes, Wood lamps, and dermatology magnifying lenses have revolutionized skin examinations, enabling practitioners to diagnose conditions with unparalleled clarity. From detecting melanoma at a cellular level to identifying fungal infections through UV fluorescence, these instruments are indispensable in modern dermatology. This blog delves into the science behind these tools, their applications, and best practices for their use. Whether you're a seasoned dermatologist or a medical professional looking to enhance your diagnostic capabilities, understanding the power of these tools is key to delivering exceptional patient care.
What is a Dermatologist Microscope: A Complete Guide for Practitioners
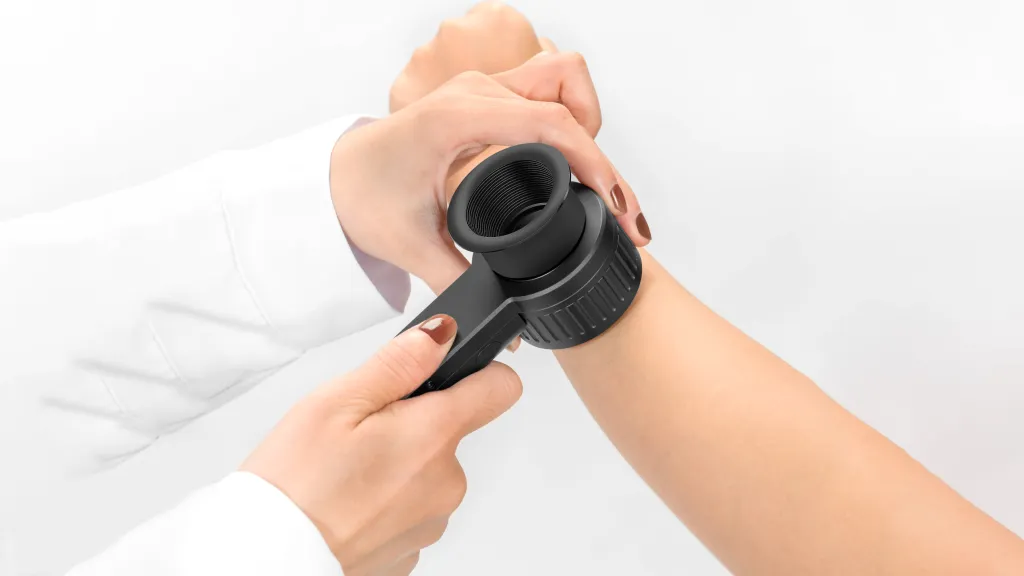
A dermatologist microscope is a specialized tool designed to provide high-resolution imaging of the skin, enabling practitioners to examine skin conditions at a cellular level. Unlike standard microscopes, dermatology microscopes are equipped with advanced optics and lighting systems tailored for skin analysis. They are commonly used to diagnose conditions like melanoma, psoriasis, and fungal infections.
How Does a Dermatologist Microscope Work?
● High Magnification: Dermatologist microscopes offer magnification levels ranging from 10x to 1000x, allowing detailed visualization of skin layers.
● Polarized Lighting: Many models use polarized light to reduce glare and enhance contrast, making it easier to identify abnormalities.
● Digital Integration: Modern microscopes often come with digital cameras and software for capturing and analyzing images, aiding in accurate diagnosis and patient communication.
Why is it Essential for Dermatologists?
Dermatologist microscopes provide unparalleled precision in diagnosing skin conditions, ensuring early detection and effective treatment plans. They are indispensable tools for both clinical and research settings.
What is Wood Lamp Examination in Dermatology? Diagnosis Through UV Light
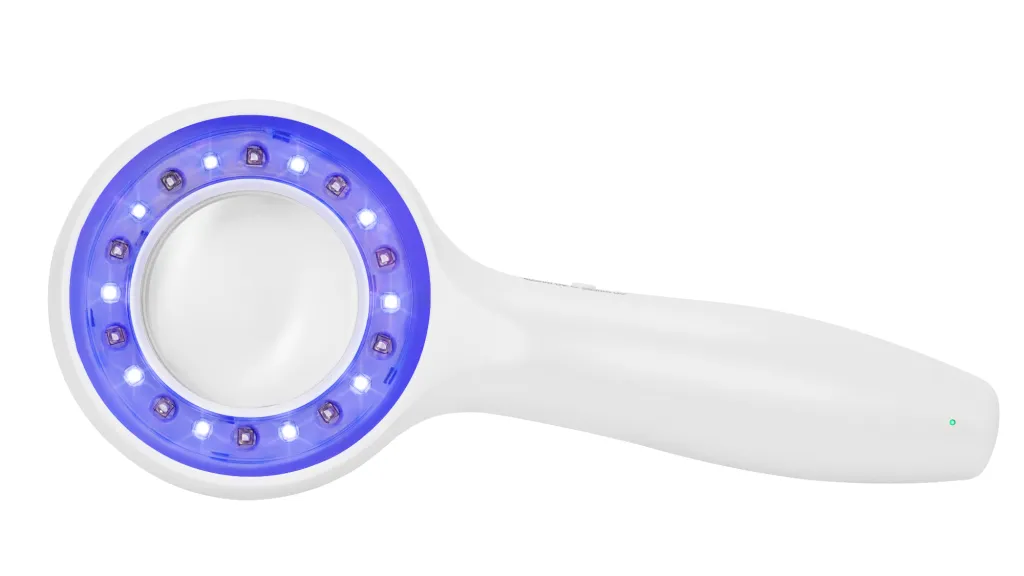
A Wood lamp is a handheld device that emits ultraviolet (UV) light to examine the skin in a non-invasive manner. This tool is particularly useful for diagnosing fungal infections, bacterial infections, and pigmentary disorders.
How Does a Wood Lamp Work?
The Wood lamp emits UV light at a wavelength of approximately 365 nm. When the light interacts with the skin, certain substances fluoresce, revealing hidden conditions:
● Fungal Infections: Appear as green or blue fluorescence.
● Bacterial Infections: Show up as red or pink under UV light.
● Pigmentary Disorders: Hypopigmentation or depigmentation areas become more visible.
Why is Wood Lamp Examination Important?
This technique is quick, painless, and highly effective for preliminary diagnosis. It helps dermatologists identify conditions that are not visible to the naked eye, ensuring timely intervention.
What is the Difference Between Regular and Dermatology Magnifying Lenses?
While both regular and dermatology magnifying lenses serve the purpose of magnification, they differ significantly in design and functionality.
Key Differences:
● Magnification Power: Dermatology lenses offer higher magnification (5x to 20x) compared to regular lenses (2x to 5x).
● Lighting: Dermatology lenses often include built-in LED lights to illuminate the area being examined, ensuring clear visibility.
● Ergonomics: Dermatology lenses are designed for prolonged use, with features like adjustable focus and comfortable grips.
Why Choose Dermatology Magnifying Lenses?
These lenses are specifically tailored for skin examination, providing the clarity and precision needed for accurate diagnosis.
What Equipment Do Dermatologists Use for Skin Examination?
Dermatologists rely on a range of specialized equipment to perform thorough skin examinations.
Essential Tools Include:
● Dermatoscopes: For examining pigmented lesions and identifying skin cancer.
● Wood Lamps: For detecting infections and pigmentary disorders.
● Magnifying Lenses: For detailed visual inspection of the skin.
● Digital Imaging Systems: For capturing and analyzing high-resolution images of skin conditions.
How Do These Tools Enhance Diagnosis?
Each piece of equipment serves a unique purpose, enabling dermatologists to perform comprehensive evaluations and provide accurate diagnoses.
How Dermatology Microscopes Work: Technology Behind Clear Skin Imaging
Dermatology microscopes combine advanced optical and lighting technologies to deliver precise skin imaging.
Step-by-Step Process:
1. Sample Preparation: The skin area is cleaned and prepared for examination.
2. Magnification: The microscope zooms in on the target area, revealing cellular details.
3. Lighting: Polarized or LED lighting enhances visibility and contrast.
4. Image Capture: High-resolution images are taken for further analysis.
Why is This Technology Revolutionary?
Dermatology microscopes allow for non-invasive, high-precision imaging, making them invaluable for both diagnosis and research.
The Science of Wood Lamp Technology in Modern Dermatology
Wood lamp technology has evolved significantly, becoming a cornerstone of modern dermatology.
How Does It Work?
The lamp emits UV light, causing certain skin components to fluoresce. This fluorescence helps identify various conditions:
● Fungal Infections: Fluoresce green or blue.
● Bacterial Infections: Appear red or pink.
● Pigmentary Changes: Highlight areas of hypo or hyperpigmentation.
Why is Wood Lamp Technology Essential?
It provides a quick, non-invasive method for diagnosing skin conditions, making it a staple in dermatological practice.
Optical Engineering in Dermatology Magnifying Lenses: A Technical Overview
Dermatology magnifying lenses are precision instruments designed to enhance the visualization of skin structures. Their effectiveness lies in the advanced optical engineering principles that ensure clarity, magnification, and minimal distortion.
What Makes Dermatology Lenses Unique?
● High-Quality Optics: These lenses use multi-coated glass to reduce glare and improve light transmission.
● Ergonomic Design: Built for comfort during prolonged use, with adjustable focus and lightweight frames.
● Integrated Lighting: Many models feature built-in LED lights to illuminate the examination area evenly.
How Does Optical Engineering Improve Diagnosis?
By combining high magnification with superior light management, dermatology lenses allow practitioners to detect subtle skin abnormalities that might otherwise go unnoticed.
LED vs. Halogen Light Sources in Dermatology Diagnostic Tools
Lighting is a critical component of dermatology diagnostic tools, and the choice between LED and halogen sources can significantly impact performance.
What Are the Key Differences?
● LED Lights:
● Energy-efficient and long-lasting.
● Produce minimal heat, reducing patient discomfort.
● Offer consistent brightness and color temperature.
● Halogen Lights:
● Provide bright, warm light but generate significant heat.
● Require frequent replacement due to shorter lifespans.
● Often less energy-efficient compared to LEDs.
Why Choose LED Over Halogen?
LEDs are increasingly preferred in dermatology due to their durability, efficiency, and ability to deliver consistent illumination without overheating.
Step-by-Step Guide to Using a Dermatologist Microscope for Skin Examination
A dermatologist microscope is a powerful tool for skin analysis, but proper usage is key to obtaining accurate results.
How to Use a Dermatologist Microscope:
1. Prepare the Patient: Clean the skin area to be examined and ensure the patient is comfortable.
2. Set Up the Microscope: Adjust the magnification and focus settings based on the area of interest.
3. Illuminate the Area: Use polarized or LED lighting to enhance visibility and reduce glare.
4. Examine the Skin: Slowly scan the area, paying attention to texture, pigmentation, and any abnormalities.
5. Capture Images: If the microscope is equipped with a camera, take high-resolution images for further analysis or patient records.
Why is Proper Technique Important?
Following these steps ensures accurate diagnosis and minimizes the risk of missing subtle skin conditions.
How to Properly Conduct a Wood Lamp Examination in Your Practice
A Wood lamp examination is a simple yet effective diagnostic tool, but it requires careful execution to yield reliable results.
Step-by-Step Guide:
1. Prepare the Room: Dim the lights to ensure the UV light is clearly visible.
2. Clean the Skin: Remove any makeup, lotions, or oils that might interfere with the examination.
3. Position the Lamp: Hold the Wood lamp 4-6 inches away from the skin.
4. Examine the Skin: Slowly move the lamp across the area, observing any fluorescence.
5. Interpret the Results:
● Green or blue fluorescence may indicate fungal infections.
● Red or pink fluorescence could suggest bacterial infections.
● White or pale areas may highlight pigmentary changes.
Why is This Method Reliable?
Wood lamp examinations provide quick, non-invasive insights into skin conditions, making them a valuable tool for dermatologists.
Mastering Dermatology Magnification: Techniques for Better Diagnosis
Effective use of magnification tools can significantly enhance diagnostic accuracy in dermatology.
What Techniques Improve Magnification Use?
● Adjust Lighting: Ensure the area is well-lit to avoid shadows or glare.
● Use the Right Magnification Level: Start with lower magnification to locate the area of interest, then switch to higher levels for detailed examination.
● Stabilize Your Hands: Use a stand or rest your hands to minimize shaking and improve focus.
Why Are These Techniques Important?
Proper magnification techniques allow dermatologists to identify subtle skin changes that are critical for accurate diagnosis and treatment planning.
Digital vs. Analog Dermatology Microscopes: Which Should You Choose?
Choosing between digital and analog dermatology microscopes depends on your practice’s needs and workflow.
What Are the Differences?
● Digital Microscopes:
● Offer high-resolution imaging and the ability to capture and store images.
● Often include software for image analysis and patient documentation.
● Ideal for practices focused on telemedicine or detailed record-keeping.
● Analog Microscopes:
● Simpler to use and often more affordable.
● Require manual adjustments for focus and lighting.
● Suitable for practices with straightforward diagnostic needs.
Why Does the Choice Matter?
Digital microscopes provide advanced features for modern practices, while analog models offer simplicity and cost-effectiveness. Your choice should align with your diagnostic requirements and budget.
10 Skin Conditions Best Diagnosed with a Dermatology Microscope
A dermatology microscope is an indispensable tool for diagnosing a wide range of skin conditions with precision. Here are 10 conditions where it excels:
What Can a Dermatology Microscope Detect?
1. Melanoma: High magnification helps identify irregular mole structures and cancerous cells.
2. Psoriasis: Reveals thickened skin layers and scaling patterns.
3. Eczema: Shows inflammation and skin barrier damage.
4. Fungal Infections: Detects fungal hyphae and spores in skin samples.
5. Basal Cell Carcinoma: Highlights abnormal cell growth in the basal layer.
6. Scabies: Identifies mites and their burrows under the skin.
7. Actinic Keratosis: Shows precancerous changes in sun-damaged skin.
8. Rosacea: Reveals dilated blood vessels and inflammation.
9. Vitiligo: Helps assess pigment loss and monitor treatment progress.
10. Warts: Detects viral particles and abnormal skin growth.
Why is a Dermatology Microscope Essential?
It provides detailed, cellular-level insights that are critical for accurate diagnosis and effective treatment planning.
Wood Lamp Applications: Beyond Fungal Infections and UV Damage
While Wood lamps are commonly associated with fungal infections and UV damage, their applications extend far beyond these areas.
What Else Can a Wood Lamp Diagnose?
● Bacterial Infections: Certain bacteria fluoresce under UV light, aiding in identification.
● Porphyria: A rare condition where porphyrins in the blood fluoresce pink or red.
● Pigmentary Disorders: Helps differentiate between hypo and hyperpigmentation.
● Acne: Reveals Propionibacterium acnes bacteria, which fluoresce orange.
● Tinea Capitis: Detects fungal infections on the scalp.
Why is a Wood Lamp Versatile?
Its ability to reveal hidden skin conditions through fluorescence makes it a valuable tool for comprehensive skin assessments.
Magnifying Lenses in Cosmetic Dermatology: Applications and Benefits
Magnifying lenses are not just for medical dermatology; they play a crucial role in cosmetic procedures as well.
How Are Magnifying Lenses Used in Cosmetic Dermatology?
● Precision in Injectables: Helps practitioners administer Botox and fillers with accuracy.
● Skin Analysis: Identifies fine lines, wrinkles, and texture irregularities for tailored treatments.
● Laser Treatments: Ensures precise targeting of problem areas during laser therapy.
● Post-Treatment Assessment: Monitors healing and evaluates the effectiveness of procedures.
Why Are They Beneficial?
Magnifying lenses enhance precision and outcomes in cosmetic dermatology, ensuring patient satisfaction and safety.
Using Dermatology Diagnostic Tools for Hair and Scalp Assessment
Dermatology tools like microscopes and magnifying lenses are invaluable for evaluating hair and scalp conditions.
What Can These Tools Diagnose?
● Androgenetic Alopecia: Identifies miniaturized hair follicles.
● Scalp Psoriasis: Reveals scaling and inflammation.
● Folliculitis: Detects infected hair follicles.
● Lice Infestations: Shows nits and lice on the scalp.
● Trichotillomania: Highlights broken or damaged hair shafts.
How to Perform a Hair and Scalp Assessment:
1. Clean the Area: Remove any products or oils from the scalp.
2. Use a Magnifying Lens: Examine the scalp for scaling, redness, or lesions.
3. Switch to a Microscope: Analyze hair shafts and follicles for abnormalities.
4. Document Findings: Capture images for patient records and treatment planning.
Why is This Important?
Accurate hair and scalp assessments lead to targeted treatments and better patient outcomes.
Accuracy Comparison: Different Types of Dermatology Microscopes
Not all dermatology microscopes are created equal. Understanding their differences can help you choose the right tool for your practice.
What Are the Main Types of Dermatology Microscopes?
● Compound Microscopes: Offer high magnification (up to 1000x) for cellular-level analysis.
● Stereo Microscopes: Provide 3D imaging with lower magnification (10x to 50x), ideal for surface-level examinations.
● Digital Microscopes: Combine high-resolution imaging with software for analysis and documentation.
How Do They Compare in Accuracy?
● Compound Microscopes: Best for detailed cellular analysis but require slide preparation.
● Stereo Microscopes: Ideal for examining larger skin areas but lack high magnification.
● Digital Microscopes: Offer the best of both worlds with high-resolution imaging and digital capabilities.
Why Does Accuracy Matter?
Choosing the right microscope ensures precise diagnoses and improves patient care.
Features to Look for in a Professional-Grade Wood Lamp
A professional-grade Wood lamp is a must-have for any dermatology practice, but not all models are equal.
What Features Should You Consider?
● UV Wavelength: Ensure it emits light at 365 nm for optimal fluorescence.
● Portability: Look for lightweight, handheld designs for ease of use.
● Battery Life: Choose models with long-lasting rechargeable batteries.
● Durability: Opt for robust construction to withstand daily use.
● Additional Filters: Some models include filters to enhance specific types of fluorescence.
Why Are These Features Important?
A high-quality Wood lamp improves diagnostic accuracy and enhances the efficiency of your practice.
Why Magnification Power Matters in Dermatology Examination Tools
Magnification power is a critical factor in dermatology tools, as it directly impacts the ability to diagnose skin conditions accurately.
What Does Magnification Power Determine?
● Level of Detail: Higher magnification (e.g., 10x to 1000x) allows for cellular-level examination, essential for detecting conditions like melanoma or fungal infections.
● Field of View: Lower magnification (e.g., 2x to 5x) provides a broader view, useful for assessing larger skin areas.
● Precision: The right magnification ensures that subtle abnormalities, such as early-stage skin cancer or fine texture changes, are not missed.
Why is Magnification Power Important?
Choosing the appropriate magnification level ensures that dermatologists can balance detail and context, leading to more accurate diagnoses and better patient outcomes.
The Evolution of Precision in Dermatological Diagnostic Equipment
Dermatological diagnostic tools have undergone significant advancements, enhancing their precision and usability.
How Has Precision Improved Over Time?
● Optical Enhancements: Modern lenses use multi-coating technology to reduce glare and improve clarity.
● Lighting Innovations: LED and polarized lighting provide consistent illumination, enhancing visibility.
● Digital Integration: Digital microscopes and imaging software allow for detailed analysis and documentation.
● Ergonomic Designs: Tools are now lighter and more comfortable to use, reducing practitioner fatigue.
Why Does Precision Matter?
Improved precision means earlier detection of skin conditions, more accurate diagnoses, and better treatment planning.
Quality Indicators for Professional Dermatology Microscopes
Not all dermatology microscopes are created equal. Knowing what to look for ensures you invest in a high-quality tool.
What Are the Key Quality Indicators?
● Optical Clarity: Look for lenses with anti-reflective coatings and high light transmission.
● Durability: Choose models made from robust materials that can withstand daily use.
● Magnification Range: Ensure the microscope offers a range suitable for both surface and cellular examinations.
● Lighting Options: Built-in LED or polarized lighting enhances visibility and reduces eye strain.
● Ease of Use: Features like adjustable focus and ergonomic design improve usability.
Why Are These Indicators Important?
High-quality microscopes deliver reliable performance, ensuring accurate diagnoses and long-term value for your practice.
Safety Protocols When Using Wood Lamps in Clinical Settings
Wood lamps are safe and effective, but proper protocols must be followed to protect both patients and practitioners.
What Safety Measures Should Be Taken?
● Eye Protection: Both the patient and practitioner should wear UV-protective goggles to prevent eye damage.
● Skin Preparation: Clean the skin to remove any substances that might fluoresce and interfere with results.
● Exposure Time: Limit UV exposure to short intervals to avoid skin irritation.
● Device Maintenance: Regularly check the Wood lamp for damage or malfunction to ensure safe operation.
Why Are Safety Protocols Necessary?
Following these protocols minimizes risks and ensures accurate, reliable results during Wood lamp examinations.
Common Mistakes When Using Dermatology Magnifying Lenses
Even experienced practitioners can make mistakes when using magnifying lenses, which can affect diagnostic accuracy.
What Are the Most Common Errors?
● Insufficient Lighting: Failing to properly illuminate the area can lead to missed diagnoses.
● Incorrect Magnification: Using too high or too low magnification for the condition being examined.
● Poor Positioning: Holding the lens too far or too close to the skin, resulting in blurred images.
● Ignoring Ergonomics: Using poorly designed lenses can cause eye strain and fatigue over time.
How to Avoid These Mistakes:
● Ensure adequate lighting with built-in or external light sources.
● Choose the appropriate magnification level for the specific examination.
● Practice proper positioning to maintain focus and clarity.
● Invest in ergonomic lenses designed for prolonged use.
Why is Avoiding Mistakes Important?
Proper use of magnifying lenses ensures accurate diagnoses and enhances the overall quality of patient care.
How to Train Staff on Proper Dermatology Equipment Usage
Training staff on the correct use of dermatology equipment is essential for maintaining efficiency and accuracy in your practice.
What Steps Should Be Included in Training?
1. Introduction to Equipment: Familiarize staff with the tools, including microscopes, Wood lamps, and magnifying lenses.
2. Demonstration: Show proper usage techniques, such as adjusting magnification, positioning lighting, and interpreting results.
3. Hands-On Practice: Allow staff to practice using the equipment under supervision.
4. Safety Protocols: Teach safety measures, such as wearing protective gear and maintaining equipment.
5. Troubleshooting: Train staff to identify and resolve common issues, like blurry images or device malfunctions.
Why is Staff Training Crucial?
Well-trained staff ensure that equipment is used correctly, leading to accurate diagnoses, improved patient care, and reduced risk of errors.
Maintenance Guide for Extending the Life of Your Dermatology Microscope
A dermatology microscope is a significant investment, and proper maintenance is essential to ensure its longevity and optimal performance.
What Steps Can You Take to Maintain Your Microscope?
1. Regular Cleaning:
● Use a soft, lint-free cloth to wipe the lenses and body.
● Avoid harsh chemicals; instead, use lens cleaning solution and a microfiber cloth.
2. Check for Dust:
● Inspect the microscope for dust buildup, especially around the lenses and moving parts.
● Use a blower brush to remove dust particles gently.
3. Lubricate Moving Parts:
● Apply a small amount of lubricant to the focus knobs and stage adjustments to ensure smooth operation.
4. Inspect Lighting:
● Regularly check the light source for consistency and replace bulbs as needed.
5. Store Properly:
● Cover the microscope when not in use to protect it from dust and moisture.
Why is Maintenance Important?
Regular maintenance prevents wear and tear, ensures accurate performance, and extends the lifespan of your dermatology microscope.
Cleaning and Disinfection Protocols for Wood Lamps Between Patients
Wood lamps are essential diagnostic tools, but they must be cleaned and disinfected properly to prevent cross-contamination.
How to Clean and Disinfect a Wood Lamp:
1. Turn Off and Unplug: Ensure the device is powered off and unplugged before cleaning.
2. Wipe the Surface:
● Use a soft cloth dampened with a mild disinfectant to wipe the lamp’s exterior.
● Avoid getting moisture into the electrical components.
3. Clean the UV Filter:
● Gently wipe the UV filter with a lens cleaning solution to remove fingerprints or smudges.
4. Disinfect the Handle:
● Use an alcohol-based wipe to disinfect the handle, which comes into direct contact with hands.
5. Inspect for Damage:
● Check the lamp for cracks or malfunctions before using it on the next patient.
Why is Proper Cleaning Essential?
Following these protocols ensures patient safety, maintains the lamp’s performance, and complies with hygiene standards.
How to Calibrate Your Dermatology Diagnostic Tools for Optimal Performance
Calibration is crucial to ensure that your dermatology tools provide accurate and reliable results.
What Steps Are Involved in Calibration?
1. Microscope Calibration:
● Use a calibration slide to adjust the magnification and focus settings.
● Ensure the lighting is evenly distributed across the field of view.
2. Wood Lamp Calibration:
● Check the UV wavelength to ensure it emits light at 365 nm.
● Test the lamp on a known sample (e.g., a fluorescent marker) to verify its accuracy.
3. Magnifying Lens Calibration:
● Adjust the focus and lighting to ensure clear, distortion-free images.
● Test the lens on a sample with known features to confirm its precision.
Why is Calibration Necessary?
Regular calibration ensures that your diagnostic tools deliver consistent, accurate results, which are critical for effective patient care.
Storing and Protecting Your Dermatology Equipment: Best Practices
Proper storage is key to preserving the functionality and lifespan of your dermatology tools.
What Are the Best Practices for Storing Equipment?
1. Use Protective Cases:
● Store microscopes, Wood lamps, and magnifying lenses in padded cases to prevent damage during transport or storage.
2. Control Environmental Conditions:
● Keep equipment in a dry, temperature-controlled environment to avoid moisture damage or warping.
3. Organize Cables and Accessories:
● Coil cables neatly and store accessories in designated compartments to prevent tangling or loss.
4. Cover Equipment:
● Use dust covers to protect tools from dust and debris when not in use.
5. Regular Inspections:
● Periodically check stored equipment for signs of damage or wear.
Why is Proper Storage Important?
Following these practices protects your investment, ensures equipment readiness, and maintains diagnostic accuracy.
This comprehensive guide explores the critical role of dermatologist microscopes, Wood lamps, and magnifying lenses in modern dermatology. Dermatologist microscopes provide high-resolution imaging for cellular-level analysis, essential for diagnosing conditions like melanoma and psoriasis. Wood lamps utilize UV light to reveal hidden skin issues, such as fungal infections and pigmentary disorders, through fluorescence. Dermatology magnifying lenses, with their superior optics and ergonomic designs, offer precise visualization for both medical and cosmetic applications. The article also highlights the importance of proper maintenance, calibration, and storage to ensure the longevity and accuracy of these tools. By mastering the use of these diagnostic instruments, dermatologists can enhance their diagnostic accuracy, improve patient outcomes, and stay at the forefront of skin care innovation.

 العربية
 简体中文
简体中文 繁體中文
繁體中文 Čeština
 Suomi
Suomi Français
 Deutsch
 Italiano
 日本語
日本語 한국어
한국어 Polski
 Português
 Русский
 Español
 Svenska